Beautiful people

Monday, September 9, 2013

It's All About Make Up Eyeliner Brush MAC 210 DUPE Review

Hi dolls,

I'm back with another update on one of my favourite eyeliner brushes. I always wear eyeliner, so having a good quality eyeliner brush is essential to appease my daily make up routine. Below is a collage of the many ways eyeliner can be worn. You can have fun with it. :)


I was given this brush to try out by my lovely boss, Danni from IAAMU last Wednesday and had plenty of time to test it out. I tested it out on myself as well as my gorgeous model, Belle, on Thursday.

I own a MAC 209 and 210 eyeliner brush so I am able to offer my comparison to IAAMU eyeliner brush.

IAAMU eyeliner brush is quite similar to the MAC 210 eyeliner brush. They both have extremely fine and tightly packed bristles, almost like an ultra thin pen tip. They both have room for movement, however, they are fairly firm and stiff which is advantageous for precise eyeliner application. The tip gives you the right amount of control you have over your application. 

I find that with some eyeliner brushes, it can be quite difficult to maneuver your line as close to the lash line as possible, but not with IAAMU eyeliner brush. I can use this brush quite effortlessly with no 'skipping' issues. 

I love how I can use both liquid and gel liners with this brush and the line will look the same with every application.

So my conclusion is; IAAMU eyeliner brush is a dupe for the MAC 210 eyeliner brush. At a fraction of the cost too as IAAMU brush retails for $15 and MAC 210 brush retails for $37. IAAMU eyeliner brush is a good solid brush, and a must have for every girl who uses eyeliner. 

You can purchase the brush in store or online at It's All About Make Up.

This is the result of using liquid liner on my gorgeous model, Belle on Thursday using IAAMU fine liner brush.


Look how precise the line is? It was so easy too!

Model - Belle
Hairstylist - Emre
Make up artist - Tiffany (myself)
Photographer - Jiajia


Love and light

Tiffany xxx

Sunday, September 8, 2013

Busy week with work + make up comp + photoshoot

Hi dolls :D

Back with an update. And this will be a prodigious blog update! I will be summing up one week in one blog post. :) Wish me luck hehe!

It's been an immensely busy week for me. Not complaining about it, I love being busy. It keeps me on my toes and gives me the best night's sleep every night. :)


Monday

So I started the week catching up with my friend for brunch and high tea. After a stressful period with a lot of dramas, I wanted nothing more than to surround myself with positive people. 

We went to Seven Seeds for brunch. This is my favorite brunch place. Their OJ is always fresh made and they always serve palatable brunch. After brunch, my friend and I had a few errands to run. I had a colour competition on the next day and almost forgot about it due to aforementioned stressful dramas the week prior to last week. 

After an hour of running errands, we decided to make our way to Hopetoun and tranquilize ourselves with tea and sweet treats. We both ordered scones! Yum!

Poached eggs with mushrooms, cauliflower puree on sourdough bread

Scones with cream and jam

Tuesday


Tuesday was the day of the Colour Your Life Competition. I am so grateful to have my beautiful friend to be my model for this competition. We met up at my school at 10.30AM roughly and pretty much got started right away with hair. Jess was so sweet, she brought me coconut water, a very delicious raw bar with chocolate and coconut and blueberry reserve. I did not have time for breakfast so the snacks Jess bought for me really helped kept me energised the whole day. Thank youuu, Jess :) I love how we are both major health freaks.

For hair, I went with a messy braid all around the hair line, and then with the rest of the hair, I choose random sections and made them into roses. I then chalked the braid with yellow and orange hair chalk I bought from Hairhouse Warehouse on Monday. It was my first time creating this hairstyle, but I must say, it turned out resplendently.

Then I moved onto make up which was way more fun than hair. :) I used a variety of colours appropriate to the theme of the competition. I also did the make up for Shirley's model, Taylah and went with a pretty rainbow on the side and bright coloured smokey eyes.

Around 2PM, it was time judging. All the models were seated and ready to be scruntised by our panel of judges at school. Shirley came first place for hair. Congratulations to her :) And I came first place for make up. Yay! Congratulations to us!

After that, we headed over to RMIT to meet up with JJ, my amazing photographer. We took some amazing photos! I really can't wait to receive them and share them all with you. :)

The hair :)
The make up :)
The make up
Taylah and Jess
Taylah and Jess waiting at the hot seats ;)
Make up I did for Taylah
Behind the scenes with Jess and JJ

Wednesday


On Wednesday, I had work at It's All About Make Up. It's always fun coming to 'work' and being surrounded by like minded people and beautiful make up. It was a little bit quiet during the day, then in the late afternoon, I taught a make up lesson to a MUA wanting to improve her techniques and update her skills. She brought a model in with her for us to work on.

We have a new range of IAAMU make up brushes at work. The brushes are amazing! The quality of the brushes are comparable to the MAC brushes I have at home. Danni, my boss gave me a free eyeliner brush to take home to use. The eyeliner brush is so fine, and the bristles are tightly packed together, making it more dense and therefore suitable for precise liner application. I am in love! Will write up another blog post on this brush alone. :)

It was heaps of fun sharing my tips to others as I often do during my make overs on clients, except, this lesson was way more detailed. We focused on eyeshadow techniques, eyeliner technique, lash application, achieving a flawless base perfect for HD cameras, contouring and highlighting, etc.

It's hard to believe you can learn so much in an hour and a half, but she was really happy and walked away with an abundance of knowledge. 

Thursday

On Thursday, I woke up pretty early to get ready for an exciting Photoshoot. We were shooting Joseph Jang's amazing range of clothing. 

We prepped hair and make up at South Wharf on our beautiful model, Belle. Emre worked on their first and I applied make up last. It was so much fun meeting the rest of the team. Everyone was so nice and friendly. In particular, I got along with Emre really well because we are both passionate about hair and make up. Not to mention, Emre is super talented at hair. I was very inspired by him. :)

After hair and make up, we went outside the carpark to shoot. JJ was the photographer. From what I can see on her camera, the photos looked phenomenal. 

The weather was unkind to us on this particular day. :( It was showering relentlessly. Lucky the make up and hair was not ruined in any way. :)

I won't be sharing the photos on here as we are planning to submit the photos for publication. I will, however, share some behind the scenes photos taken on the day. :)


Friday


On Friday, I worked at IAAMU. It was quite busy due to formal night. The atmosphere was amazing. Everyone was upbeat and excited about the formal happening that night. We talked about make up, hair, dresses, heels, etc. 

I had a few clients who have never had their make up done before. They were a tad nervous, but also super excited to get their make up done. Suffice to say, every formal girl walked out happy and looking beautiful.

One particular client was a bit concerned about eyeshadow not showing up on her eyes as her eyes were hooded. I reassured her that eyeshadow can still show up and look amazing on hooded eyes. You just have to take the colour higher than the crease. Doesn't she look amazing? She was stoked by how beautiful the result was.

This is why I love being a MUA. I feel a great sense of satisfaction enhancing my client's beauty and seeing them happy.

My gorgeous client rocking a bright lip colour and bronze eyes

Saturday

Saturday was by far the busiest day of the week for me. I woke up around 7AM to get ready to vote and then head off to work. Surprisingly, the huge line moved quickly. Mummy and I finished voting in 25 minutes. Not bad at all. I anticipated a much longer wait time.

After voting, I went to gym and then off to work I go. It was another busy busy day. Back to back with clients for a formal as well as our usual special events clients. :)

Although there was no time for a lunch break, surprisingly, I had to much energy. There was so many beautiful make up happening that day. As usual, Anna and Danni did a phenomenal job on make up. All our clients looked stunning. :)

As it was super busy, I only had time to take photos of some of my clients. I shall share with you and let the photos do the talking. :)


I used MODELROCK lashes on all my clients. Above I used Modelrock lashes in #244 cut in half for a more natural look and below with the glitter smokey eyes, I used Modelrock #241 lashes. 

I absolutely adore Modelrock lashes. They are so natural and always look so amazing on. We stock them at It's about Make Up. They are normally $13 a pair, but if you buy 10 pairs, you can get them for $6.50 each pair.

After work, I met up with Sylvia and we had Thai food for dinner. :) Then we went to gym together. I didn't really feel like going out as I was drained from a long day of work.

Sunday


Went to COSTCO with my brother and mamma bear. Stocked up on so much food and drinks. After Costco, I went to grab fish and chips locally. They serve the best fish and chips ever. :) I actually feel like I'm on the beach on a sunny day when I eat their fish and chips.

Then went to walk my babies... or rather, they walked me. They are always so so so excited when we take them out for a walk. 

And that pretty much sums up my week. :)

Love and light

Tiffany

xxx


Sunday, August 25, 2013

Parian Spirit Brush Cleaner Reviews

Hi beauties,

I'm back with a product review on my absolute favorite on-the-go brush cleaner of all time... The Parian Spirit Brush Cleaner!!

So what is it exactly...?

"Parian Spirit is made from citrus spirits and food grade solvents, giving it powerful cleaning properties designed to gently clean, condition and disinfect fine brush hair. This cleaner dissolves all types of makeup products including powder, liquids, wax-based products and adhesives. It conditions brushes as it cleans and is quick-drying. The orange scent comes from the natural orange oils used in the formula. It is non-toxic." - Parian Spirit

I just love the way my brushes look and feel after using the Parian Spirit Brush Cleaner. I have one in my kit and one on my vanity table for my own personal brushes. It really cleans the brushes really well without damaging the bristles at all. In fact, my brushes look and feel as if its brand new. 

Did I also mention it smells beautiful? That beautiful citrus scent gives off a very refreshing kind of feeling. I normally don't like cleaning my brushes, but with the Parian Spirit handy, I actually love sitting down and cleaning my brushes. It cleans them effortlessly. 

I especially dislike cleaning my eyeliner brushes and lip brushes because does not come off at all. Not all of it! Gel liner and lipstick is really difficult to remove... so after cleaning them as per normal, I will normally go over them with a Parian Spirit and wipe on a paper towel. Voila! And... it's all clean again. :)


Before and after
Cleaned my angled brush from gel liner
Hope this review was helpful. :)


Saturday, August 24, 2013

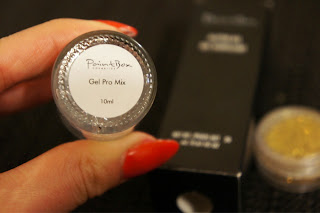
Paintbox Cosmetics Gel pro mix - Gold glitter cut crease eyes
Hi lovely readers (if you still exist)

I know, I know... it has been a while. I had abandoned this blog and started a new blog, and then stopped blogging on the new blog due to my hectic lifestyle.

Out of curiosity, I decided to visit my old blog again and was surprised to see how many visitors I get. So the good news is... *drum rolls*

..
..
..

I will be updating this blog regularly from now on. 

Now to share with you a recent 'gold glitter cut crease' look I created. I used 'Paintbox Glitter Gel Pro Mix' as my glitter adhesive. It is truly an amazing product and I cannot recommend it enough! My glitter stayed put the whole day and night till it was time for me to remove it. And I even applied the glitter over my crease a little and the glitter did not budge nor did it crease. And the best news is that it was really easy to remove. I used a make up wipe and voila!!! Gone! Well most of it was gone... I still had little specks of gold glitter on my face... like Edward Cullen. ;)


You can purchase this amazing product from Paintbox cosmetics.

They have a wonderful range of foundations, eyeshadows and blushes as well. 'South beach' blush is one of my favourites. It is a dupe for the cult favourite 'NARS ORGASM' blush. Blog post about this blush will follow shortly.

Have a great night! :)


Thursday, October 4, 2012

Make Up Forever Flash Palette + Pop Art Inspired Make Up

Hey everyone,

Today was a beautiful sunny day in Melboune without all the rain, wind and clouds. Today was true to spring weather as it should be. :)

I have been heaps busy today, with school, work and preparing for school competition. I am entering 'Headmaster's Awards Night 2012' competition in hair and make up. 

Today I did a predone photographic hair and make up photoshoot for the competition. The wonderful model I worked with is Vanessa Joli. :) I create a beauty 'Pop Art' inspired look.

I mainly used my Make Up Forever (MUFE) Flash palette to create this look. I really love how handy this palette is as it is extremely versatile. You can use this palette as eyeshadow, blush, create your own foundation shade, shape your brows, and apply on lips. (Only some colours though.)

Ever since I bought this palette, I have been using it on every photoshoot I do. I bought my little palette from Makeup and; Glow. If you work in the beauty industry, you can apply for an industry discount and get 10% your order. Anyway, this is a MUST HAVE palette to have in your kit if you are a make up artist. It is perfect for photoshoots as the make up will only need to last for a few hours at most. Otherwise, it is not very long lasting as it is very emollient (lots of slip) unless you use it with Make up Forever Aqua Seal or equivalent, and some setting powder. Ben NYE neutral set powder is the longest lasting.

The colours in the palette are extremely pigmented. They go on smoothly, blends like a dream. You can ever make your own foundation by mixing some brown, white, yellow, red and peach and adjust it to your skin tone. If you are more cool toned, you can add a bit of blue. Either way, have a play around with it and you can mix up some pretty crazy colours.

I highly recommend this palette for all make up artists or make up lovers out there!

Now for some swatches and photos.

MUFE Flash Palette

MUFE Flash Palette
Swatches - From Left to Right : Gold, Coral, Turquoise, Fushcia, Yellow, Black, Silver, White, Red, Blue, Leaf Green, Brown.
See what I mean by highly pigmented? Even after removing the swatches with a make up wipe, you can still see the stain.
And now on to my Pop Art inspired look.


Model: Vanessa Joli

Front view with eyes closed.
Side view.
Front view with eyes open
I edited this photo to make it look more cartoon like. :)

Me and Vanessa.
 All photos are taken with my iPhone and have not been edited except for the second last photo which I stated has been edited.

To create the 'Pop Art' inspired look; I used the following:

Face

Dermalogica Smoothing Cream
MUFE Microperfecting HD Primer
Graftobian HD foundation in Ingenuine
MUFE Aqua Liner in Black

Eyes

Purple eyeshadow from the 'Something Bright' Yaby Palette
MUFE Aqua Liner in Black
Maybelline Mascara
False lashes
MUFE Flash Palette - Red for the dots

Lips

MUFE Aqua Liner in Black
MUFE Aqua Eye Pencil in White
OCC Lip Tar in Stalker


For hair, I just pinned up the fringe in a mini quiff, teased hair at the back and tied it up in a simple pony tail. Then I use a yellow temporary hair colour to colour the hair.

This look is so simple to create. It is quite time consuming to apply and also remove the make up. There were a few left over red dot stains on my model's skin, even after cleansing her face with cleanser and make up wipes. 

PS: Most of the make up I've used to create this look can be purchased from Makeup & Glow. 

Hope you enjoy this blog post. :)


Love and light,

Tiffany.

Wednesday, March 21, 2012

Make up order + OCC Lip tars + Z Palettes + More

So a few days ago, I made a huge order on Makeup and Glow. 

I ordered large zebra print Z palettes, dark duo eyelash glue (because I ran out), some OCC lip tars, Yaby eyeshadow refills and Makeup & Glow's own brand of Eyeshadows/Blushes, Beauty So Clean and the Beauty Blender Cleanser (also because I ran out.)

I am so happy with my order as it came beautifully wrapped and packaged as always in pink tissue paper. 

I bought 7 OCC liptars in: Grandma, Cha Cha, Pageant, Tarred, Clear, Narcissus and Harlot.

I bought 5 Makeup & Glow eyeshadows in Snow White, Coca, Coral, Bubble Gum and Metallic Star Dust.


So let’s talk about the lip tars first. In general, the lip tars are absolutely amazing in terms of longevity of wear, ease of application, an array of colour choices, highly pigmented, vegan and animal cruelty free, and overall great quality. A little goes a long way even if it may appear small (8mls, 0.27 FL OZ), you only need less than a pea size amount to cover your lips. Plus the nice pepper mint smell is a bonus.

The only things I can fault on the OCC lip tars are the packaging. It tends to leak (self-dispensing) and if you are not carefully and squeeze a lot out, then you’ll just be wasting a lot of product. I had some in my makeup kit and it leaked onto my other lipsticks even though the lid is screwed on pretty securely. Now I just put them in a clear package in case they leak. Also, you must shake well before you use the lip tars. I got ‘Tarred’ (black – used for mixing), and for some reason, no matter how vigorously I shook it, it came out really oily. I had to squeeze a ¼ of the tube to get rid of the oiliness, and even then, it still came out pretty oily. (You can see it in the swatches that it came out pretty oily and runny.) I think it’s just this one that has that problem though because my friend’s ‘Tarred’ seems to be fine. Also I would not recommend OCC Lip tars for extremely dry and cracked lips. If you have dry lips, please exfoliate beforehand and prime with a lip conditioner prior to application.

But despite the cons, the pros definitely do outweigh the cons. It’s affordable, extremely pigmented, vegan, great range of colours and you can always mix colours together to get even more range of colours, etc. 

So here’s a little run down on the colours I got:

  • Grandma is described as a “clean classic coral.”
  • Cha Cha is described as a “pinked cantaloupe.”
  • Pageant is described as a “beauty queen fuschia.”
  • Tarred is described as a “true black and a mixing must.”
  • Clear is used to “mix or sheer other lip tars.”
  • Narcissus is described as “a creamy lavender toned pink.”
  • Harlot is described as a “fiery coral red.”
My order from Makeup & Glow
OCC Lip Tars from Left to Right - Harlot, Grandma, Cha Cha, Clear, Pageant, Narcissus and Tarred.

Swatches taken with flash - From left to right - Harlot, Grandma, Cha Cha, Clear, Pageant, Narcissus, Tarred.

OCC Lip Tar swatch taken without flash - From left to right - Harlot, Grandma, Cha Cha, Clear, Pageant, Narcissus, Tarred.


Z Palette filled with Makeup & Glow Eyeshadows, Yaby refills and Inglot refills.
What the Z Palette looks like closed.

Taken without flash : From left to right - Make up & Glow Bubble Gum, Coral, Cocoa, Snow White & Metallic Star Dust.
Taken with Flash: From left to right - Make up & Glow Bubble Gum, Coral, Cocoa, Snow White & Metallic Star Dust.

The Z Palette is fantastic. It comes with magnets with stickers so when you depot your blushes/eyeshadows, etc, you can simply just stick on the magnet and attach to the Z Palette. Plus it has a clear covering so you can see all your blushes, eyeshadows, etc.

Hope you all enjoy my review.